Bitcoin Newbie’s Guide
I started trading in Bitcoin with $300 two months ago, and I’ve already tripled my money. This article goes over the simple steps I took to get started investing with Bitcoin.
I was lucky enough to jump in when BTC was trading at $4,000 USD, and as of this writing, it is $10,800 USD. I have withdrawn my principal investment, and the profits are what I have been using to continue investing.
First, a disclaimer: I’m not much of an investor, but I am smart enough to jump on a bandwagon when there’s this much activity going on. I’m also smart enough to learn the things I need to know about something new, but even then, learning about blockchain was intimidating.
Step 1: Blockchain Basics
Before you get into Bitcoin investing, it’s good to learn the basics of how the Blockchain works. Watch this video:
Or this one:
Got the basics? Good.
Step 2: Open a Coinbase account
Coinbase is the most user-friendly method to converting your cash into Bitcoin.
Coinbase has three advantages:
- You can deposit funds with your credit card.
- The graphs are really visually appealing.
- You can trade between 3 types of cryptocurrencies: Bitcoin, Ethereum, and Litecoin.
The transaction fees are high (4%) so this isn’t a good site to use for day trading. However, before getting into high-volume transactions, you just have to get a bitcoin into your BTC wallet, and Coinbase makes this easy to do.
If you find this article helpful, please use my affiliate link to open your Coinbase account. At no cost to you, Coinbase will give us each $10 USD of free Bitcoin. https://stellarplatforms.com/coinbase
Step 3: Verify your Coinbase account.
You will need to verify your email address, and if you are linking a bank account, verify ownership through micro-deposits. This could take a day or two, so be patient.
Step 4: Make a deposit.
Once you have deposited at least $100 USD (and we each get $10 USD of free Bitcoin, yay!) then you can make your first trade.
Step 5: Buy Bitcoin.
You can buy Bitcoin, Litecoin, or Ethereum through Coinbase. Pick one, any one, just get started.
Keep in mind, Coinbase does take a 4% fee for every transaction you make, so this is not a platform for high volume trading. Right now, we are just getting you Bitcoin into your BTC wallet. If you want to make money on trading, there are 2 easy options to choose from below.
Congratulations! You now own Bitcoin.
You can sit on it, and deposit a modest amount every month; or, when you are ready, you can grow your money faster using one of the 2 methods below.
Extra Credit: Limit Orders at Bitstamp.
Bitstamp (https://www.bitstamp.net) is one of the few places where you can buy Ripple (XRP) as of this writing, and that’s why I chose this cryptocurrency exchange. The fees are very low — 0.25% per trade — making this an ideal place to practice your trading skills.
To get Bitcoin into your Bitstamp account:
- Go to Bitstamp -> Deposit -> Bitcoin
- Copy the Address for your BTC Wallet
- Go to Coinbase -> Accounts -> BTC Wallet -> Send
- Paste the address, select the amount, and send
This allows you to transfer from Coinbase to Bitstamp, and the record of this transaction is on the Blockchain. (You watched those videos above, right? Good, then you know how this works.)
High Volume Ripple Trading
Ripple has a lot of potential — it’s one of the cryptocurrencies that is getting vetted by major financial banks, as a potential transition onto the blockchain. Because of this, it’s looked down upon by hard-crypto advocates, but for my money, I am happy to invest in something that gets mass-adoption.
The biggest reason I am interested in Ripple is: it has the highest volume of any cryptocurrency. This means lots of people are buying and selling it, and the price fluctuates (a lot) around the $0.25 USD range. This makes it a great candidate for basic day trading.
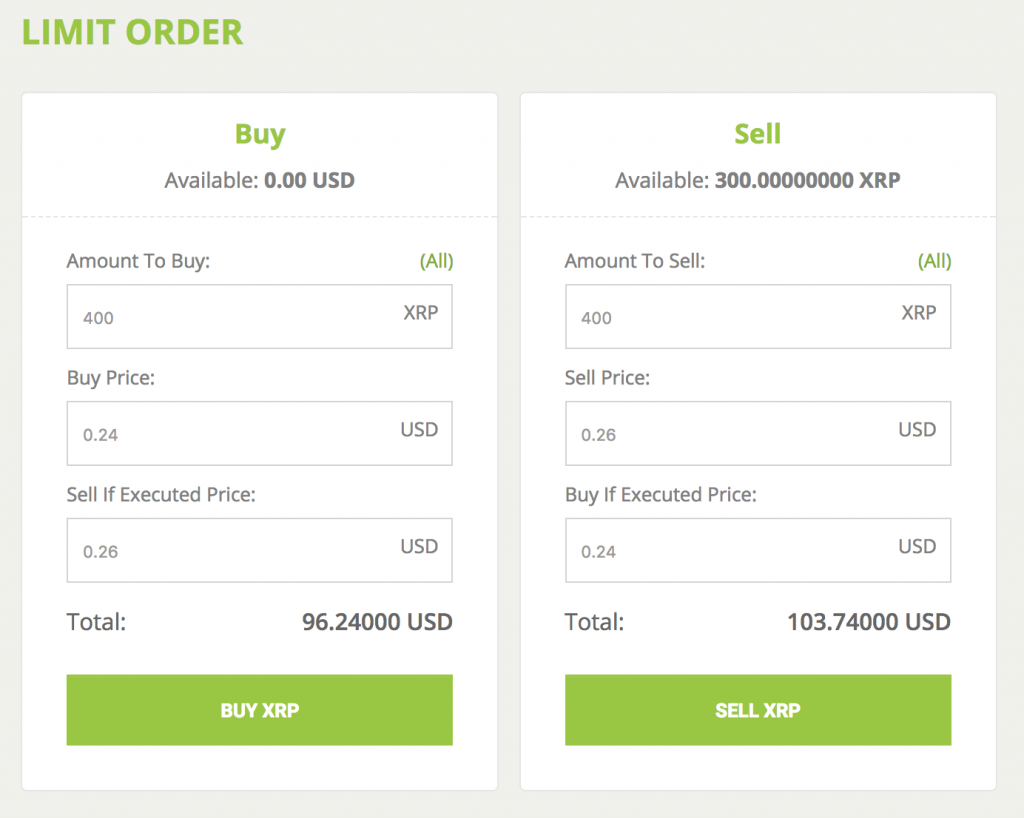
Once you know how to buy XRP on an exchange, Bitstamp will allow you to do many advanced types of trading orders, but there’s only one I’m going to introduce here: Limit Orders.
A Limit Order can automate your ‘Buy Low, Sell High’ formula to profiting off of your investment. Here’s how it works:

When making a Limit Order, you can define the price at which you want to buy, and if the price falls to that level, you make a trade at that price. (The ‘Advanced’ option on the Limit Order opens a second box, to ‘Sell If Executed,’ which automatically opens another order if the first order happens.)
This means that you can profit from the volatility of the prices, by setting up some simple orders. In the example above, you can invest $100 in XRP at 0.25, and set a Sell Limit Order of 0.26 with a Buy if Executed follow-up order of 0.24. This simple formula will earn you 7.5% on your $100 investment.
With the volatility of XRP, if the price reaches 0.24 and 0.26 in the same day, you can earn 7.5% on your investment every day.
- Buy it when it gets low — automatically.
- Sell it when it gets high — automatically.
Then, when you do this a second time, you have the profits from your first trade assisting you. Easy, right?
Disclaimer
I’m not a financial professional. I don’t know much about trading. I’m just a guy who was able to scrape together a couple hundred bucks, and turned it into a couple hundred more in Bitcoin. If my advice sounds good to you, compare it with other advice on the internet (there is plenty) before making a decision. Caveat emptor, yo.
